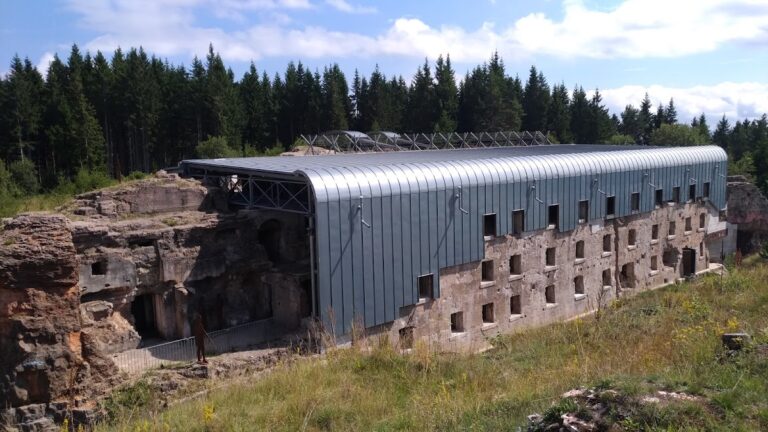
Forte Sommo Alto: An Austro-Hungarian Border Fort in Italy


Site at a Glance
- Rating
- 4.3
- Popularity
- Low
- Country
- Italy
- Primary era
- Modern
- External website
- Open
- Eras represented
- Modern
- Civilizations
- Austria-Hungary, Habsburg
- Site type
- Military
- Remains
- Fort
On this page14 sections
History
Forte Sommo Alto is an Austro-Hungarian concrete fort near Folgaria, Italy, built between 1910 and 1914 as part of the empire’s early twentieth-century frontier defenses. Also known as Zwischenwerk Sommo, it stood on the Lavarone-Folgaria plateau near Passo Coe, at an elevation of 1,613 metres. The fort formed the middle work of the Folgaria barrier, a group of seven fortified positions guarding the border with Italy.
Construction and defensive purpose
The Austro-Hungarian War Ministry, the empire’s central authority for military administration and planning, approved the installation on 19 May 1910. Work began on 20 June that year and continued until 25 September 1914. The fort cost 982,000 Austrian crowns, not including its armament, and its planning was attributed to Oberleutnant O. Hauenstein.
Forte Sommo Alto was designed to protect the right flank of Werk Sebastiano and to block the Valle Orsai to the north. In cooperation with Werk Serrada, 2.5 kilometres to the southwest across the Val di Penchla, it controlled the Val di Penchla and the road linking Arsiero with Folgaria. Its position also helped secure the ground between neighboring fortified works. The original plan called for two 10-centimetre howitzers in armored casemates directed toward Werk Serrada. This arrangement was abandoned in favor of two T.H. M9 turret howitzers mounted on the casemate block, while a proposed battery of two 6-centimetre casemate guns was cancelled after construction had started.
The nominal establishment was two officers and 177 enlisted personnel. Oberleutnant Denaro became the first commander, and Captain Kalifus assumed command on 6 April 1915. By May 1915, the garrison comprised eight officers, 132 enlisted men, and 56 Landsturm laborers. The Landsturm was an Austro-Hungarian territorial reserve and militia force.
First World War service
The infantry detachment originally intended for the fort came from the Imperial-Royal Landesschützen Regiment Trient No. I. These mountain infantry troops were still serving on the Eastern Front when the fort was required for operations, so the emergency garrison drew on the Imperial-Royal Landesschützen Regiment Bozen No. II, the 2nd Company of Fortress Artillery Battalion No. 1 from Tenna, and the 1st to 4th companies of Fortress Artillery Battalion No. 8 from Haidenschaft and Wippach. Additional Standschützen companies, locally organized rifle units used for territorial defense, occupied the approaches.
Preparations for the Austro-Hungarian offensive of May 1916 brought a further artillery staff of 25 officers and 65 enlisted men. The resulting overcrowding reflected the fort’s changing wartime role. In May 1916, its guns supported the advance by firing on Monte Maronia and Costa d’Agra. Unlike the forts of the Lavarone group, the Folgaria works remained armed after the offensive because their forward position continued to matter. Forte Sommo Alto retained its artillery until the end of the war, although all but one of its machine guns were removed. During the Austro-Hungarian retreat in November 1918, it fired at the opposing lines until its ammunition was exhausted.
Bombardment and wartime modifications
Italian infantry never made a direct assault on Forte Sommo Alto. From May 1915, however, two 28-centimetre howitzers fired approximately 1,400 rounds against it. The heaviest bombardment took place between 26 August and 7 October 1915. Italian fire produced 712 impacts within the fort’s grounds, although only 49 struck the structure itself, and 11 hit the armor without penetrating it.
On 30 August 1915, a 28-centimetre shell struck the armored front of the rotating observation cupola and lodged there without exploding. Its tip projected 17 centimetres into the turret shaft, incapacitating the cupola crew, killing the telephone operator, and seriously wounding the observer. The shell was later defused.
The installation of an Italian 14.9-centimetre field-gun battery on Col Santo, 7.5 kilometres away at an elevation of 2,112 metres, exposed the fort’s gorge front to fire. An earth embankment was raised to the upper floor, and the exposed windows were protected as far as possible with sandbags. Because the Col Santo battery also observed and harassed the road and entrance, a protected rock tunnel was driven from the basement toward a sheltered point on the road. Completed in June 1917, the tunnel and its storage caverns measured 395 metres in total and carried telephone and water lines while also supplying fresh air.
Postwar survival
Royal Decree No. 1882 of 12 August 1927 removed the fort from the military works register so that its iron could be recovered. On 1 January 1932, it was granted to the municipality of Folgaria for a 29-year term and was later sold to the municipality by the military administration. Alpine troops assisted with repairs, and the fort was subsequently opened to the public.
Steel reinforcement was removed from the concrete during demolition work in the 1930s. The work appears to have been carried out more carefully than at several other forts in the area, allowing Forte Sommo Alto to survive without complete destruction. The structure has since been restored and can be entered.
Remains
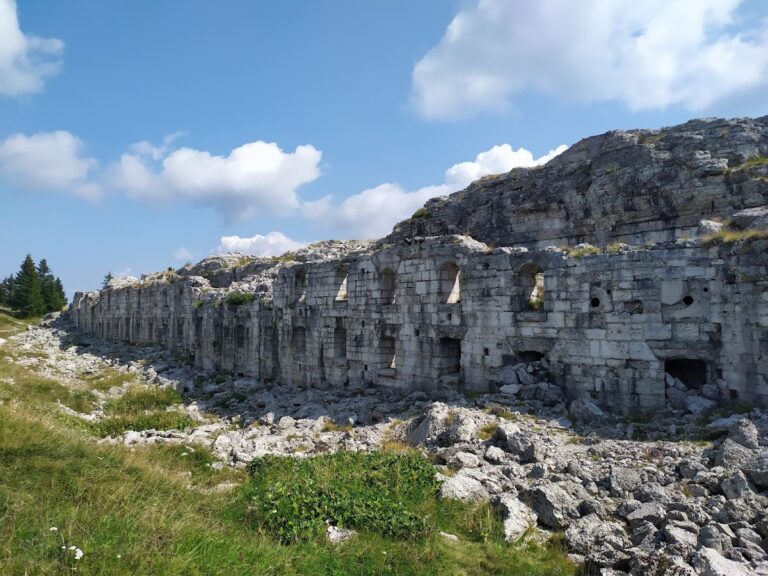
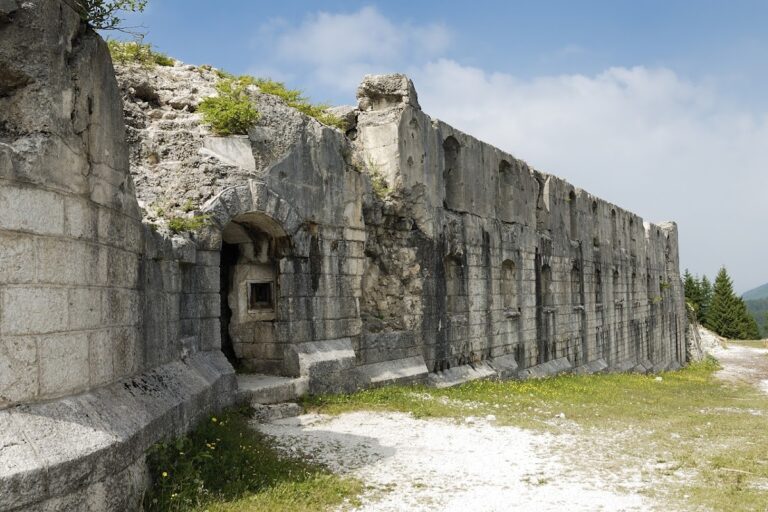
Forte Sommo Alto is organized around a long concrete casemate block attached to natural rock at both ends, with two forward infantry installations known as the S and R complexes. These installations formed an interval-defense system, intended to cover ground between neighboring forts or slopes hidden from the main work’s guns. The fort’s surviving fabric includes the casemate block, armored cupolas, galleries, protected passages, water installations, and external defensive positions.
Casemate block
Main concrete structure
The casemate block is a rectangular three-level structure. Its basement contains a continuous front passage, while the ground floor held the internal service and fighting spaces. The upper floor contains the gun wells for the turret howitzers. The roof was covered with galvanized sheet metal for protection against the weather and carried two rotating howitzer turrets, a rotating armored observation cupola, and a machine-gun armored cupola above the projecting gorge caponier. A caponier is a projecting defensive structure designed to protect a ditch or approach with direct fire. A trench-like light shaft in the gorge admitted daylight to the basement windows.
Armored cupolas and protection
The two artillery cupolas are rotating steel structures 25 centimetres thick, each designed to mount a 105-millimetre Model 09 howitzer. They are the fort’s T.H. M9 turret howitzers. The third cupola was a rotating observation position equipped with a machine gun. Four advanced armored positions added 18 machine-gun positions, 14 of them in fixed armor. A gallery system, including one passage approximately 170 metres long, connected these positions with the fort.
The battery-block roof was between 2.50 and 2.80 metres thick, while its walls were originally 2.80 metres thick and were later increased to 3.80 metres during the war. Casemate ceilings with clear spans of up to five metres were reinforced with I-beams. NP 40 beams were used on the uppermost level, and NP 30 or NP 26 beams served in smaller or deeper rooms. Every second beam was additionally anchored with iron. Corrugated metal sheets between the beams helped keep detached concrete fragments from falling, while NP 14 T-beams stood vertically along the outer roof edge and were tied to the reinforcing iron.
Passages and defensive installations
Internal connections
Basement passages connected the casemate block with the R and S infantry positions through protected posterns. A postern is a sheltered passage linking a fort’s interior with an external position or route. Other passages led toward the crypt, the gun turrets, and the observation turret. The optical signaling station was reached from the artillery-material depot. The main entrance became unusable during the war, so a postern built in 1915 provided access to the fort road.
R and S complexes
The R installation consists of two adjoining bunkers, identified as the left and right R complexes. A rock-cut postern connects them to one another and to the casemate block. Their position covered the otherwise unseen slope toward Val Orsara as an interval-defense installation.
The S installation also consists of two adjoining bunkers, known as the front and gorge S complexes. They are connected to each other and to the casemate block by a rock-cut postern. Their fire covered the access road and the slope toward Passo Coe, areas that could not be seen from the casemate block. A close-defense ditch between the S complex and the battery block was partly blasted into rock and partly formed in concrete. A protected exit from the postern between the two sections led to the ditch.
Gorge and outer defenses
The fort had no conventional surrounding ditch or true gorge ditch. Instead, a machine-gun position to the left of the entrance covered the gorge, while another armored-casemate machine-gun position covered the slope toward Folgaria. A broad barbed-wire obstacle surrounded the fort shortly before hostilities began, and trenches, wire entanglements, and minefields further covered the surrounding ground.
Water, communications, and access tunnels
A security gallery descended inside the fort and emerged outdoors after approximately 200 steps. Excavated during the first year of the war and completed in summer 1916, it provided an alternative entrance. The separate protected passage toward the road extended for 395 metres and incorporated storage caverns. Together with the internal posterns, these routes linked the casemate block to the fighting positions and to the sheltered approach.
Water reached the fort through an aqueduct and pumping apparatus and was stored in two cisterns, each holding 380 hectolitres. Communication with Werk Sebastiano and Werk Serrada used ordinary telephone lines and an optical signaling system based on a modified Morse code. The fort’s comparatively moderate bombardment left its remains less severely destroyed than those of other Folgaria works. A stairway installed in the right howitzer turret well now provides access to the interior.
Nearby sites